How To Install Google Optimize And Run A/B Tests On Your Website: Data Driven Daily Tip #209
WATCH
LISTEN
READ
This blog post documents the long but rewarding process of installing Google Optimize into your website so that you can run awesome experiments and get real data to optimize your website, and not guess or use opinions.
This is also known as A/B Testing. While there are several third party tools that allow non-web developers and content managers and digital marketers to set up website experiments, such as Optimizely, Hotjar, VWO and Crazyegg, we are electing to use Google Optimize for it's easy integration with the rest of the Google Suite of tools, like Google Analytics and Google Tag Manager, which reminds me, before we get started, you'll need the following.
1. Google Analytics Installed On Your Website (Click here for How To Install Google Analytics)
Additional things you will need:
1. Access to your website. If you're using a WordPress website, which many of our clients do, you'll want to install the Head and Footer Scripts Inserter Plug-in.
2. A Free Google Optimize Account, which you can get by going to http://optimize.google.com/ and signing in with your regular Google Analytics credentials.
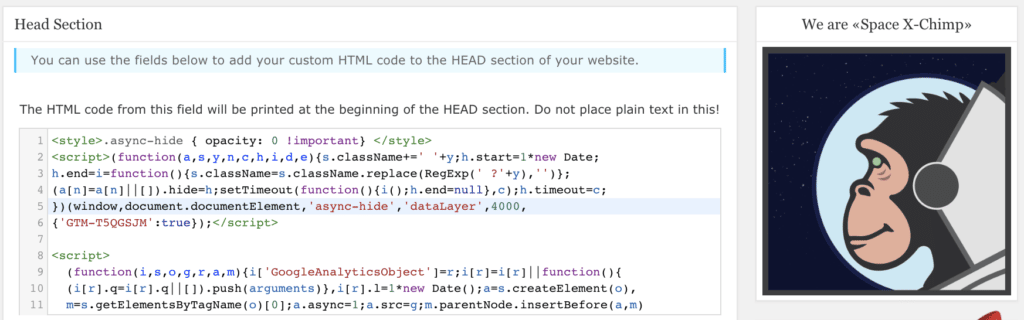
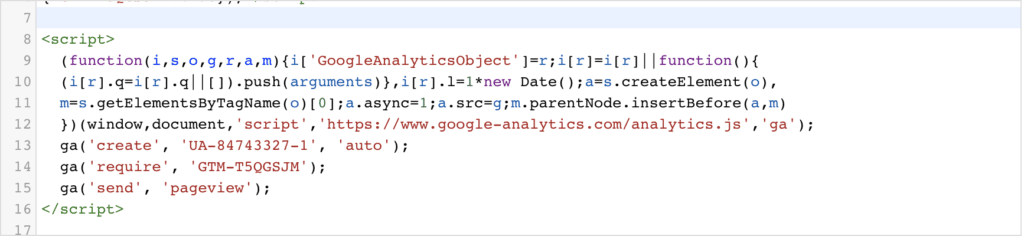
Then, After you log into Google Optimize, you'll open up your website's backend (with access to the Header Code) in a separate tab and follow the instructions in the right hand side of your Google Optimize Account under "Install Google Optimize" to grab and deploy the Modified Google Analytics Code, also available here.
Get the Optimize snippet
The recommended way to deploy Optimize is to add it to your existing Google Analytics tracking code directly on your website, not through a tag management solution.
Get the Optimize snippet:
- Go to your Experiments page.
- Locate the Container information panel (on the right side of the page).
- Click Install Optimize snippet.
- Click the blue VIEW SNIPPET button.
- Follow the on-screen instructions.
The snippet dialog contains your modified Analytics tracking code and the optional page-hiding snippet, customized with your Optimize container ID. Both are ready to be deployed on the web pages that you wish to experiment on.
Step 1: Deploy the modified Analytics tracking code
To begin running experiments on your website you need to add the modified Analytics tracking code to your page’s HTML code. You can add the code to all of your web pages or just the pages that you wish to experiment on.
To deploy Optimize, copy the modified Analytics tracking code from the dialog box in Optimize and place it as early as possible in the and before any other tracking scripts (not used in experiments).
Learn about the order of the snippets below.
Step 2: Deploy the page-hiding snippet
In addition to the modified Analytics tracking code, we recommend that you also install the page-hiding snippetwhich reduces the risk of page flicker. This section of code helps also ensures that users on slow connections have a better experience by only showing experiment variants when the Optimize container loads within the set timeout.
The next step is to Serve Optimize Via Tag Manager, which is available here, or easier explained in the video on this page. Here is more on setting up tags in Optimize.
Step 3: Configure the Optimize tag in Tag Manager
Once you have the information above, follow the Tag Setup Guide for Optimize in Google Tag Manager:
- Click Tags
New.
- Click Tag Configuration
- Enter your Optimize container ID (also known as the Optimize snippet ID.)
- Select a Google Analytics Settings variable.
- Click Save. Proceed to save the tag without triggers.
- Open any Google Analytics Page View tags that are triggered on pages where you want the Google Optimize tag to be fired.
- Click Tag Configuration
- Check the box to fire a tag before this tag fires. Under the Setup Tag heading, click the menu and select the desired Optimize tag.
- Save your tag configuration and repeat on any other Google Analytics Page View tags as needed.
- Publish your Tag Manager container for the changes to take effect.
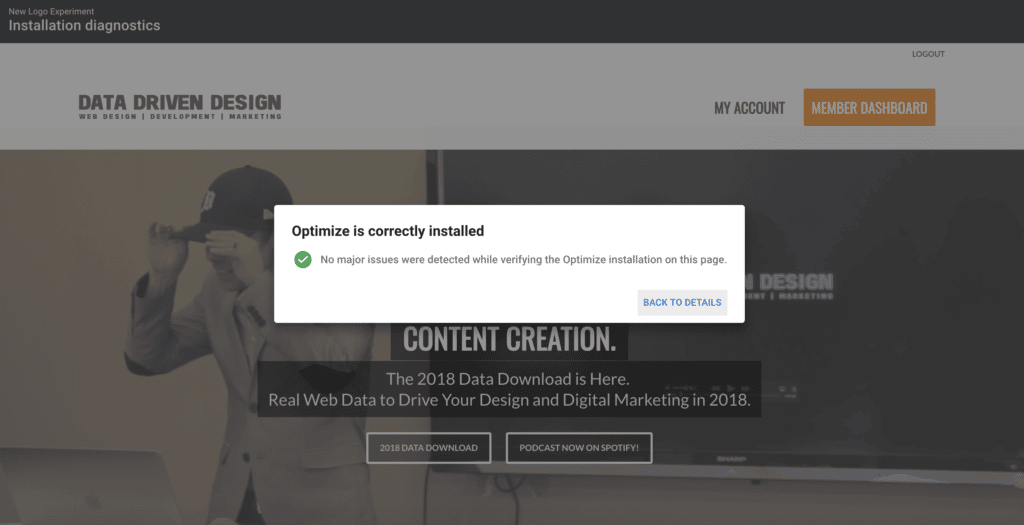
Once your code has been installed, and your tags have been displayed, you need to verify your installation within Optimize by clicking "Run Diagnostics" in your Optimize Dashboard. It will load your page, and may give you a couple common errors related to the Page Hiding Snippet. Regardless of if it says to have your Tag Manager ID in the Page Hiding Snippet code instead of your Optimize ID, you need to keep it as your optimize ID, and the most important thing is to simply make sure your Page Hiding Snippet is above your Modified Google Analytics Code, and that it is in the top of your site wide code.
This is why I like using the Head and Footer Scripts Inserter Plug-In in WordPress for this.
When completing these steps and validating your Optimize set-up, you may initially get multiple errors related to your Page Hiding Snippet after clicking "Run Diagnostics" in the bottom right.

But as long as you have the code in the top of your like this...

Just flush your server cache multiple times and keep clicking "Run Diagnostics" (shown above) until you get the success screen...
Now that this arduous process is over, you're actually able to easily log into Google Optimize and run any number of experiments now.
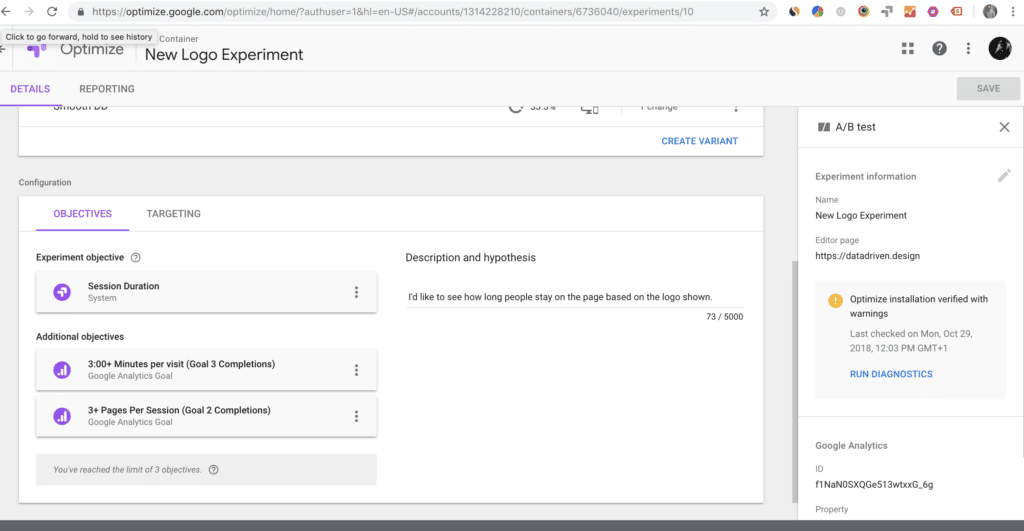
Objectives on you experiment are extremely important. They show you which variation of your experiment "won" and why.
For example, you can set objectives based on eCommerce transactions, Google Analytics goals, or pre-set objectives within Optimize, like which variation keeps users on the page the longest, which creates the least amount of bounces, and more.
We will definitely have more content on how to read your experiment result reporting and make data driven decisions based on those reports, but for now, you're off and running with Google Optimize installed on your website.
Thanks for reading, watching and listening, and have a great day!
KEEP MARKETING!
Paul Hickey, Founder / CEO / Lead Strategist at Data Driven Design, LLC has created and grown businesses via digital strategy and internet marketing for more than 10 years. His sweet spot is using analytics to design and build websites and grow the audience and revenue of businesses via SEO/Blogging, Google Adwords, Bing Ads, Facebook and Instagram Ads, Social Media Content Marketing and Email Marketing. The part that he’s most passionate about is quantifying next marketing actions based on real data.